In today’s dynamic world, the adaptability of spaces in our homes and offices is paramount. Whether you’re craving a bit of privacy, designing a makeshift home office, or simply wanting to give a fresh look to your space, understanding how to divide a room with a temporary wall can be a game-changer. This guide will delve deep into the realm of temporary walls, showcasing expert insights, and providing you with a roadmap to achieving the division of space effortlessly.
The Evolution of Room Division
Historical Perspective
Room divisions are as ancient as civilization itself. From the stone partitions of ancient caves to the ornate wooden screens of medieval times, humans have always sought to define and personalize their spaces. These divisions reflected both practical necessities and aesthetic desires.
Modern-day Needs
Today, as urban spaces shrink and rents soar, maximizing every square inch becomes crucial. Enter temporary walls – the modern answer to adaptability, functionality, and style. They allow us to swiftly adapt to changing circumstances, be it an unexpected guest, a new hobby, or a work-from-home routine.
Why Opt for Temporary Walls?
Flexibility and Functionality
Permanent walls, once built, are hard to undo. Temporary walls offer the chance to rearrange spaces according to ever-evolving needs. Whether you have a growing family, changing work requirements, or shifting hobbies, these walls are your answer to a flexible living arrangement.
Cost-Effectiveness
Renovation costs can burn a hole in your pocket. Temporary walls, however, offer a budget-friendly alternative to full-fledged construction. Plus, they save you the mess and fuss of brick and mortar!
Materials for Constructing a Temporary Wall
Plywood and Sheetrock
Durable and robust, plywood and sheetrock are popular choices for those wanting a wall that mimics the sturdiness of a permanent one. While they might require a bit more effort in installation, they promise longevity.
Canvas and Fabric Dividers
For those who lean towards a lighter, more bohemian vibe, canvas and fabric dividers can be a dream. Easy to install and remove, they also offer a canvas (pun intended!) for artistic expressions.
Planning and Design
Space Assessment
Before diving into the installation, it’s vital to measure the space. Assess the width, height, and overall area where the wall needs to be installed. This ensures a snug fit and avoids last-minute hassles.
Style and Aesthetics
Your temporary wall doesn’t have to be bland. Decide on a design that complements your space. From chic monochromes to vibrant patterns, the choices are endless!
Step-by-Step Guide
Preparations
Clean the area and gather all necessary tools. It’s always better to be over-prepared than to run around looking for that elusive screwdriver mid-installation.
Installation Process
Start by marking the points where the wall will meet the ceiling and floor. Securely fix the support beams, ensuring they’re aligned. Once the structure is in place, install the chosen material, be it plywood, canvas, or anything else.
Safety Considerations
Anchoring and Stability
Safety first! Ensure the wall is anchored well to prevent any accidents. This is particularly crucial if you’re using heavier materials.
Material Safety
Opt for non-toxic materials, especially if the wall is meant for children’s rooms or areas with pets.
Aesthetics and Decor
Paints and Wallpapers
A fresh coat of paint or a stylish wallpaper can elevate the look of your temporary wall. Choose colors and patterns that blend seamlessly with your existing decor.
Decorative Accessories
Hang some art, add a shelf or two, or drape fairy lights. Accessories can transform your temporary wall from a mere divider to a statement piece.
Maintenance and Upkeep
Cleaning Tips
Regularly dust and clean the wall. Depending on the material, you might need specific cleaning agents to ensure it remains spotless.
Longevity and Durability
While temporary, these walls can be quite long-lasting if maintained well. Regular checks for wear and tear can prolong their life.
Removal and Reinstallation
Dismantling Process
When it’s time to bid adieu to your temporary wall, ensure you carefully dismantle it. Store or dispose of the materials responsibly.
Storage Solutions
If you plan to reuse the wall, store it in a dry, safe place, ensuring it’s free from potential damage.
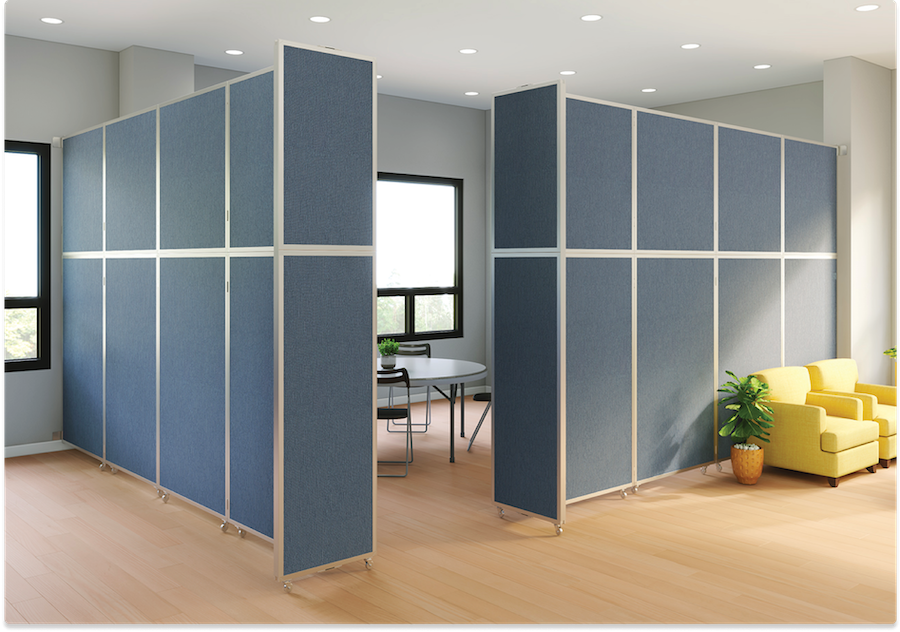
How to divide a room with a temporary wall
An Expert’s Personal Experience
When I first tried to divide my study from the living room, I was skeptical. However, once I got down to it, the results were nothing short of magical. Not only did I get a private space to work, but it also added a stylish flair to my apartment. Over the years, I’ve experimented with various materials and designs, and each time, the temporary wall has stood as a testament to flexibility and style.
Cost Implications
Budgeting
Set a clear budget before starting. This helps in choosing materials and designs that don’t break the bank.
Hidden Costs
Watch out for unexpected costs, like extra fixtures or specific cleaning agents. It’s always wise to keep a small buffer in your budget.
FAQs
How long does it take to install a temporary wall?
Typically, a few hours to a day, depending on the material and design.
Is a permit required for installing a temporary wall?
In some areas, yes. Always check local regulations before starting the installation.
How sturdy are these walls?
While not as robust as permanent walls, they’re durable enough for everyday use. Proper installation and anchoring ensure stability.
Can I hang things on my temporary wall?
Absolutely! However, it’s wise to check the wall’s weight-bearing capacity, especially if you plan to hang heavier items.
What’s the best material for temporary walls?
There isn’t a one-size-fits-all answer. Plywood and sheetrock offer sturdiness, while canvas and fabric dividers provide flexibility and style.
How do I remove a temporary wall without causing damage?
Carefully! Start by removing any fixtures or accessories. Dismantle the wall panel by panel, ensuring you don’t apply excessive force.
Conclusion
Understanding how to divide a room with a temporary wall offers a blend of flexibility, functionality, and flair. Whether you’re seeking privacy, creating new spaces, or simply wish to dabble in interior design, temporary walls are an asset. Armed with this comprehensive guide, you’re now ready to transform your spaces with ease and confidence. Happy dividing!